Robot Art Show:
For our 8th project, we were assigned to build a robot that could do a task that would entertain robots in the future. We chose to do a robot that would play a certain song and include the name of the song and a timer measuring the duration of the song. However, this was only the main project. Before we started this Arduino board project, we learned the basics of circuit work.
After we finished the complete circuit program, we started to learn the basics of engineering with breadboards and how to use potentiometers and resistors. We concluded the second program by taking a light quiz to test the lessons we learned in the previous sections.
Lastly, we put all of our knowledge together to create something unique. Juan and I debated about what we should do and finally settled on the idea to make a song. We chose the song "Fountain of Dreams", a song from Super Smash Bros. Melee. To compare the tracks, we have given a link of the original piece below.
Now that you have the video above, you can compare the song and our recreation of it. But we didn't want to just leave our project there. We wanted to add more. To make our project more unique, we decided to add a LCD light to the breadboard that names the song and counts the duration of it. Surprisingly, the hardest part to set up was the LCD, even though it was an optional touch. All it took to set up the Music was a wire from one side of the battery, a buzzer, and a wire connecting to the other side of the battery. Now, let me explain how I created the code. We first learned about how to make music on a Arduino in Circuit 11 of our third program. Basically, the song making is split apart by the notes and the rhythm. For example, there is one string containing all of the notes, and a separate array containing all of the rhythms. Each note corresponds with the rhythm in order, making the correct song. I had to spend a lot of time during lunch and after school working on this, because making a song is very time-consuming. Eventually, we replicated the song shown above, making that our finished product.
This is the code we made to create this song. The code is commented to explain what is happening. Feel free to take a look at it.
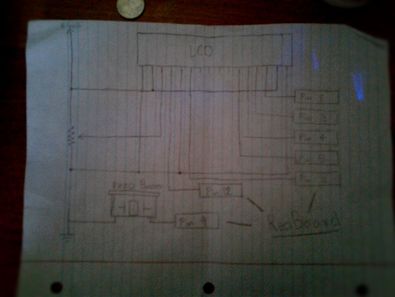
Circuit Diagram of the Song and LCD.
Content:
|
During this project, we learned and redefined lot of new terms and concepts. I have listed all of them below:
PROGRAM #1: CIRCUITS AND CONNECTIONS: Battery: The battery is the power source of a circuit. There are usually conductors connecting the batteries to a object that can display that energy, such as a light bulb. Check "1" in the slideshow for more information. Light Bulb: The light bulb is the object in the circuit that displays energy. It gets it's power from a source, such as a battery. Check "2" in the slideshow for more information. Alligator Clips: We've discussed the two important parts in a circuit, but not what connects them. These are called alligator clips. These clips connect the power source to the display. Check "3" in the slideshow for more information. Ammeter: An ammeter is a device that measures the electric current in a circuit through amperes. Check "4" in the slideshow for more information. Voltmeter: A voltmeter is a device that measures the electric potential in voltage. Check "5" in the slideshow for more information. Although these were the basic tools we had, we also learned about some new concepts and terms during this program. Voltage: Potential energy difference from one side of a component to the other.The "push" of energy or the potential energy difference. Analogies really help me understand so I linked this picture that I found comparing electric flow to water flow. The voltage will split during series and stay the same during parallels. Check "6" in the slideshow for more information. Current: Flow of change/electricity through the circuit. The current splits during series and stays the same during a current, being the opposite of voltage in those terms. Check "6" in the slideshow for more information. Resistor: The resistors in a circuit are the components that limit the electric flow or current in the circuit. Check "6" & "7" in the slideshow for more information. Parallel: Parallels in circuits are when the route in the circuit splits into a number of routes. For example, think of a road diverging into two lanes. Or think of sledding down a downhill slope and diverging into two lanes. Either way, there is more space open for people, meaning there was more current. However, the force pushing the people sledding stays the same, meaning the voltage stays the same. Check "8" in the slideshow for more information. Series: Series in circuits are when the route is a single path. Since it is a single path, the space doesn't increase or decrease, making the current stay the same. However, since there are two sources in the path, the voltage gets lost, like a uphill slope during sledding, you lose a little downhill force. Check "9" in the slideshow for more information. Circuit: Loop of conductive material from one power source to the other. |
Ohm's Law: Ohm's Law is the law that the Voltage equals the current*resistance, represented by V = IR.
Power: flow of change/electricity through the circuit. PROGRAM #2: START OF BREADBOARDS: Potentiometer: A resistor that's resistance can be changed by tightening to get the resistance needed. LCD: Liquid Crystal Display; crystal displays polarized light, (restrict light) LED: Light Emitting Diode, emits light when given voltage. Kirchhoff's First Rule: The total energy coming into a node is equal to the total energy coming out. Resistance: The amount of slowing of the current through an obstacle. PROGRAM #3: PUTTING OUR SKILLS TO WORK: Boolean Variable: A variable rendered as either true or false. Integer Variable: A variable rendered as a whole number. Float Variable: A variable that can be any fractional variable. String Variable: A variable that can contain letters, numbers, and other characters. Array Variable: A variable that can contain a set of values (numbers, letters, etc.) Constant Variable: A variable that cannot be changed during the execution of the code. Void Setup: Everything in this function happens in the beginning of the program, the setup. Void Loop: Everything in this function constantly loops. Include Statements: Used to include important files to make the code possible to run. |
Reflection:
This project overall was great. Honestly, I absolutely despised the first program with the lights, circuit, and power source experiments, but it only got better from there. After the first program, we started getting into the basics of breadboard experiments which was much more interesting. After that, we got the freedom to use what we learned and make a robot that is entertaining for an art show. Looking back at this whole assignment, I did a lot of good things during this project. Once I got the hang of the coding, I was highly motivated and spending whatever time I had in the STEM room working on the assignment. I also think I nailed the song and am proud of myself for how much I worked and put effort in this project.
However, I think I could've improved more on the 1st and 2nd packets. Although I did do well on the final project, I could've focused more during the 1st packet (specifically) and been more in charge during the 2nd packet. I should have been more focused during those and in charge.
In the end, I think I did really good in this project specifically because the third program fit my career choice and my interest got me a long way. I am going to choose this for the Do it Better Project because I am very interested in this area and as much as I know, I feel like I have a lot to learn. I want to learn because the more I learn in this area, the more prepared I will be for my career. And step by step, I will get better.
